Live traps are handy to have around.
You can catch varmints that are eating your garden.
You can catch varmints that get into your trash.
You can catch squirrels, rabbits, woodchucks and so on for personal consumption.
If you have an accidental catch like a neighbor's cat or small dog then you can let it go.
They are handy but some of the most common ones benefit from a few tweaks to improve them.
Increasing headroom
One problem with this particular style of trap is that the door droops down. Big old Mr Raccoon or Mr Woodchuck can bump the door with their back on the way in. The trigger disengages when their back lifts the door. If the weight of the door or the motion of the trigger rod spooks them they can easily escape because the door never closed enough to engage the lock.
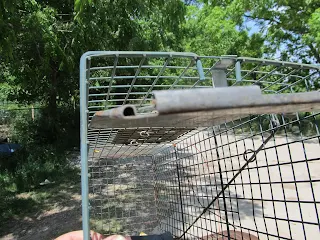 |
| If you sight down the rolled edge of the door you can see that it is kinked upward in the middle. |
The problem is exacerbated because when you do catch Mr Raccoon or Woodchuck, he pries up on the door as he tries to push-through to escape. These traps are built lightly enough that they can put a bend in the trap door.
 |
| There are countless ways to fix the bent door. One way is to jam a piece of firewood between the bent section and the top of the cage and then to lift up on the door to reverse the bend. Another way is to insert a screwdriver through the square openings in the side and lift up on the door. |
 |
| If you sight down the rolled edge now you will see that the middle is now kinked downward. |
 |
| That looks much better. I probably gained 2" of head room. |
Support rings
The trap originally had two of these split, support rings holding the rod between the tread plate and the trigger. After catching a few animals one of them rotated around and no longer retained to the wire mesh of the cage.
It was little loss. There is a better way.
 |
| First a short lesson in mechanics. The rigid trigger rod has an instantaneous center somewhere below the trap as shown by the red lines. You can calculate that visually by extending the pivoting members shown in the red ellipses. Fortunately the pivoting members are straight. |
 |
| It is called an instantaneous center because at the precise moment in time every molecule of the rigid trigger rod is rotating around that axis. |
 |
| Consider the orange line. At this precise moment the point where the orange line crosses the trigger bar is also rotating about all points along the orange line. That is, you can tie a line to the wire of the cage and to the trigger rod and as long as that line is pointing at the instantaneous center it will not screw up the dynamics. |
 |
| Ya, it really works. It binds less than the rings, too. |
 |
| You also have the option of fiddling with the trigger. You can smooth it. You can grease it. You can bend the hood to make it look like an "L" or you can increase the bend to make it more like a "J". I left it alone. |


No comments:
Post a Comment
Readers who are willing to comment make this a better blog. Civil dialog is a valuable thing.